How to Read Ice Thickness for Safe Ice Fishing
There’s nothing quite like the crisp air, the silence broken only by the crackle of a heater, and the thrill of pulling a fish through a hole in the ice. But let’s be real, ice fishing in New York comes with a unique set of challenges, and the biggest one by far is knowing if the ice beneath your feet is truly safe. It's a common frustration—you look out at a frozen lake, it seems solid, but how do you really know? This guide is here to cut through the guesswork and equip you with the essential knowledge and techniques to accurately read ice thickness and ensure your safety on the hardwater.
Why Understanding Ice Thickness is Absolutely Critical
The allure of the frozen lake or pond is undeniable, especially during prime ice fishing season in New York. However, beneath that enticing sheet of white and blue lies a dynamic, often unpredictable environment. Many seasoned anglers, and especially newcomers, often underestimate the critical importance of understanding ice thickness, and sadly, this oversight can lead to genuinely dangerous situations. It’s not just about avoiding a chilly dunk; it’s about preventing serious injury or worse.
The Silent Dangers of Thin Ice
Thin ice is not always obvious. It can look solid, uniform, and inviting from the shore, especially when covered with a layer of snow that hides its true consistency or lack thereof. The danger isn't always a dramatic collapse; sometimes, it's a slow give, or a sudden, unexpected plunge into frigid water. Hypothermia sets in rapidly, motor skills diminish almost instantly, and the weight of your winter gear can drag you down quickly. Moreover, thin ice often occurs in conjunction with other hazards, like strong undercurrents that can pull you beneath the surface or into even more precarious sections of the ice. The psychological impact of breaking through is also immense, potentially leading to panic, which further exacerbates the physical dangers. This isn’t meant to scare you away from the joy of ice fishing, but rather to underscore the gravity of proper ice assessment. It's truly a matter of life and death, making it the number one safety consideration for any ice angler.
Common Misconceptions About Ice Safety
It’s astonishing how many myths and old wives' tales circulate about ice safety, and believing them can put you in harm's way. One prevalent misconception is that "the ice freezes from the top down, so it's always thickest at the surface." While ice does form on the surface, its uniformity and thickness can be severely compromised by warm spells, heavy snow (which insulates and slows freezing), or fluctuating water levels. Another dangerous belief is that "if someone else is out there, it must be safe." This is a huge gamble. That person might be taking unnecessary risks, or they might be equipped with specialized gear and knowledge that you lack. They might also have a different risk tolerance or simply be unaware of localized dangers. Relying on others' judgment without your own assessment is a recipe for disaster. We also hear "it's been cold for a week, so it must be good." Consistent cold is certainly a major factor, but underlying conditions like moving water, natural springs, or even pollution can create localized thin spots regardless of surface temperatures. Always assume the ice is unsafe until proven otherwise, and always verify conditions for yourself.
The Tools of the Trade for Measuring Ice
You wouldn't head out onto the open water without a rod and reel, right? Well, approaching hardwater without the proper tools to assess its integrity is an even bigger oversight. Guessing is simply not an option when your safety is on the line. Having the right gear not only makes the assessment process easier and more accurate but also builds your confidence in venturing out.
Essential Gear for Ice Thickness Assessment
Before you even step foot on the ice, you need to be prepared. The absolute first tool you should have is a spud bar. This is a heavy, chisel-like tool used to test ice strength ahead of you as you walk. It’s your first line of defense, letting you tap, listen, and break through weak spots from a safe distance. A strong spud bar can tell you if the ice will support your weight with a few solid thrusts. If it breaks through in one or two hits, you know to back off. Next, an ice auger is non-negotiable. Whether it's a hand auger, a propane-powered model, or a high-tech electric auger, it’s essential for drilling holes to get a precise measurement. You can't just guess how thick the ice is; you need to see it, and an auger makes that possible. Finally, a simple tape measure is indispensable. After drilling a hole, you'll use this to get an exact reading of the ice depth. Don't forget basic safety items like ice picks (worn around your neck for quick access) and a throw rope – these aren't for measuring, but they are crucial if your measurements, or anyone else’s, prove to be tragically inaccurate. For those looking to upgrade their safety gear, a quick search on Amazon will show you a range of options, from various auger types to survival suits.
How to Use an Ice Auger and Tape Measure Effectively
Once you have your spud bar to confirm initial safety, it's time to get down to the precise measurements. As you venture out, drill holes frequently, especially as you move into new areas or if conditions seem to change. Don’t wait until you're halfway across the lake to check the ice again. After drilling a hole with your auger, push your tape measure down through the hole until the end catches on the bottom of the ice sheet. Then, read the measurement at the surface. It’s that simple, but the frequency and locations of your measurements are key. For example, if you're approaching a river mouth on Lake Ontario, you should be drilling holes much more often than in the middle of a frozen pond, as currents can drastically thin the ice. You might find a spot where the ice looks great, only to drill a few feet away and find it's significantly thinner due to a hidden spring. Remember, your "Best Auger for New York Ice Fishing" should be sharp and efficient, allowing you to quickly and easily drill test holes without expending too much energy, which is especially important in cold conditions.
Deciphering Ice Color and Texture
Beyond just thickness, the quality of the ice is paramount. Not all ice is created equal, and understanding the visual cues can tell you a lot about its strength, even before you drill a hole. Different formations and colors signify different levels of structural integrity, and learning to differentiate them is a skill every New York ice angler should cultivate.
Clear, Blue Ice: The Strongest Indicator
When you encounter clear, blue ice, you’re looking at the strongest and most reliable type of frozen water. This forms when temperatures drop steadily and consistently, allowing the water to freeze slowly and uniformly without interference from snow, slush, or rapid temperature fluctuations. The blue tint comes from the absorption of longer light wavelengths, leaving the shorter blue wavelengths to scatter and be seen. This ice is dense, hard, and has the most structural integrity for its thickness. For example, 2 inches of clear, blue ice might offer as much strength as 4 or 5 inches of cloudy or snow-covered ice. It’s the kind of ice that "rings" when you strike it with a spud bar, indicating its solid composition. While even clear blue ice has its limits, it’s the gold standard for ice fishing safety. Always prioritize areas with this type of ice, and remember that even here, depth must be checked, but you can generally trust its strength more than other types.
White, Opaque, and Honeycomb Ice: Proceed with Caution
Now, let's talk about the trickier stuff. White or opaque ice is generally weaker than clear ice. This often forms when snow falls on thin ice and then freezes, creating a "snow ice" or "slush ice" layer that’s full of air pockets. It’s less dense and therefore less strong, requiring significantly more thickness to support the same weight. If you're out on one of New York's Finger Lakes, and you see a large section of white ice, you should immediately be more cautious and increase the frequency of your ice checks. Honeycomb ice is even more concerning. This forms as ice begins to melt and refreeze, or when warmer water currents erode the underside. It has a distinctive crystalline, columnar structure, resembling a honeycomb, and can become incredibly weak, even if it appears thick from above. You might step on it, and it could simply crumble beneath your weight, offering little to no resistance. This is particularly common later in the season or around areas with current. Always treat white, opaque, or especially honeycomb ice with extreme caution, requiring double or even triple the thickness you’d typically trust for clear ice.
Understanding Snow-Covered and Layered Ice
Snow-covered ice presents its own unique set of challenges. Firstly, snow acts as an insulator, preventing the ice underneath from freezing thicker, even during prolonged cold snaps. If a heavy snowfall occurs early in the season, the ice beneath might remain deceptively thin. Secondly, snow can hide dangerous thin spots, cracks, or open water, making visual assessment impossible. You might be walking on what looks like a uniform blanket of snow, unaware that a few feet ahead lies a patch of slush over minimal ice. When ice fishing in New York, especially during a big winter, you'll encounter a lot of snow-covered ice. Always use your spud bar diligently when navigating these areas. Layered ice, often visible in your auger hole, indicates different freezing events. You might see a layer of clear ice, followed by a layer of white snow ice, and then another layer of clear ice. This stratification isn't necessarily bad, but the weakest layer dictates the overall strength. It's like a chain – it's only as strong as its weakest link. Always measure the total thickness but be wary if a significant portion of that total is made up of weaker, opaque ice.
Minimum Ice Thickness Guidelines for Various Activities
One of the most common questions among ice anglers is, "How much ice is enough?" While there's no single, universally perfect answer due to varying ice quality, the New York State Department of Environmental Conservation (DEC) and other safety organizations provide clear guidelines that should be strictly adhered to. These are not suggestions; they are minimums to ensure a reasonable degree of safety. Disregarding them can lead to dire consequences, especially if you're venturing out on larger bodies of water like Lake Erie.
Foot Travel: What's Safe for Walking?
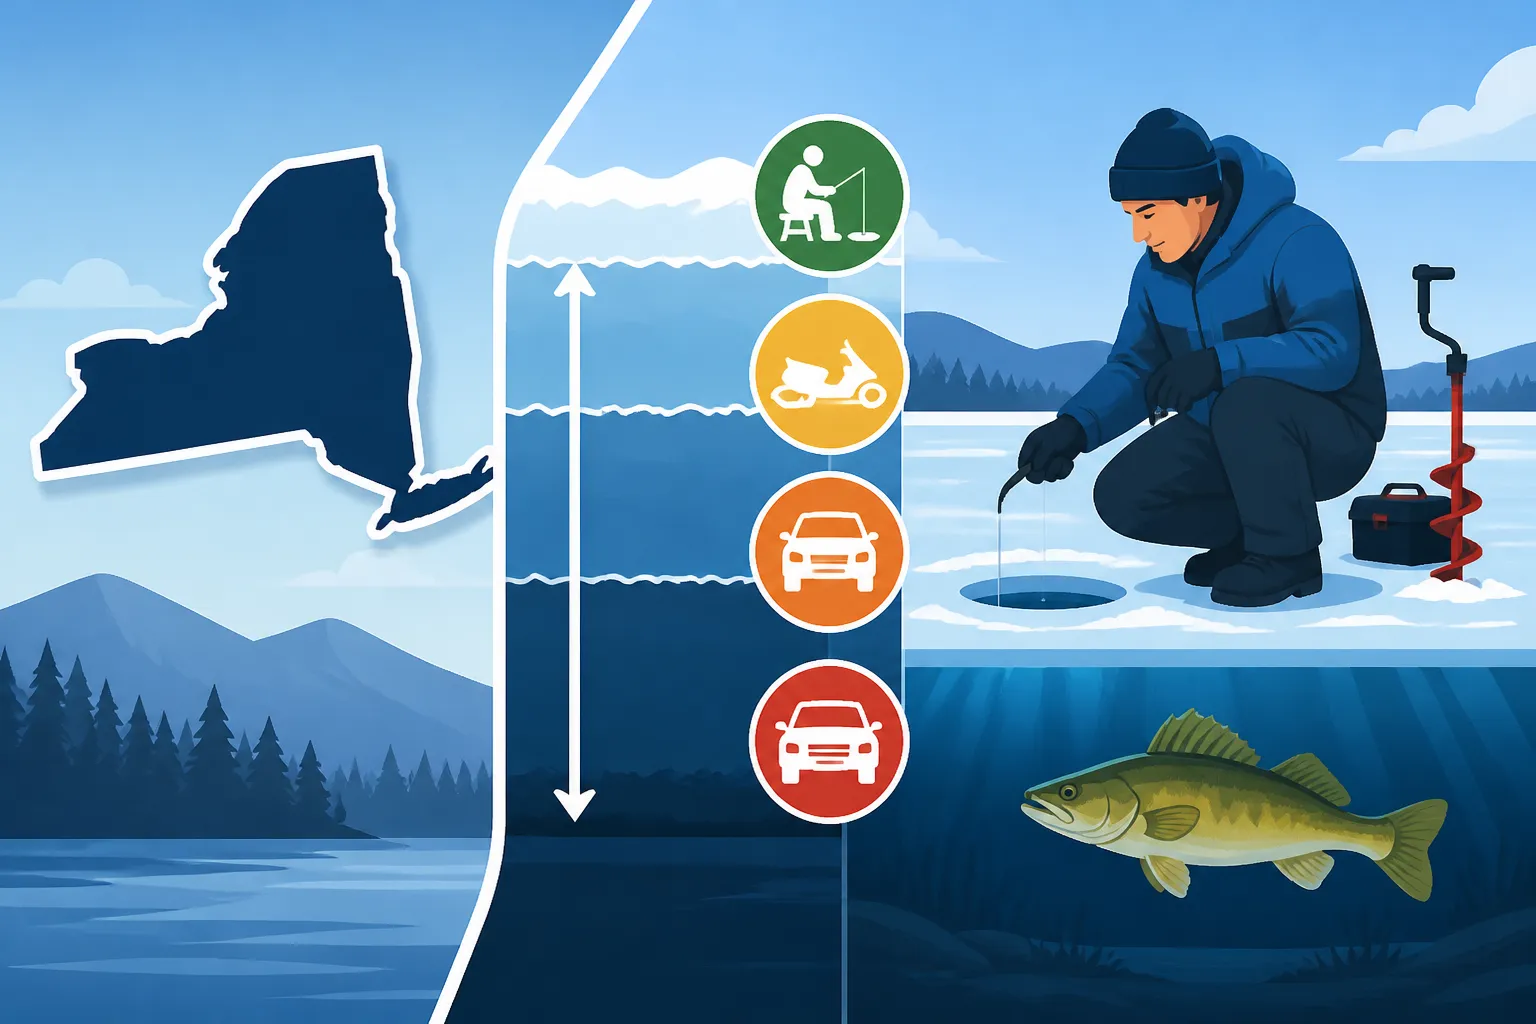
For a single person walking, carrying minimal gear, the general recommendation is a minimum of 4 inches of clear, solid ice. This is for foot travel only. However, it's crucial to understand that this is a bare minimum. If you're carrying a heavy ice shanty, a spud bar, an auger, and a bucket full of gear, your effective weight is much higher, and you'll want more cushion. Moreover, this 4-inch rule applies to clear, solid ice. If the ice is white, opaque, or appears layered, you should double that minimum, aiming for 8 inches or more, even just for walking. Remember, this guideline is for stable, healthy ice. Areas with currents, natural springs, or newly frozen patches will require even more caution and greater thickness. Always use your spud bar to check ahead, and drill test holes frequently. Don't take chances, even if it seems like a short walk.
Snowmobiles and ATVs: When Can You Bring Them On?
Bringing a snowmobile or an ATV onto the ice dramatically increases the risk and therefore, the required ice thickness. For snowmobiles and ATVs, the recommendation jumps significantly to 5-7 inches of clear, solid ice. This increase accounts for the machine's weight, the driver, and any passengers or towed gear. These vehicles also create vibrations and concentrated pressure points that can stress the ice more than a person walking. It’s also much harder to react quickly if an ATV or snowmobile breaks through, and recovery is far more dangerous and difficult. Before bringing any motorized vehicle onto the ice, not only should you ensure the ice meets these minimums, but you should also be extremely familiar with the body of water and local ice conditions. Some lakes, especially rivers or large flowages, may never be safe for vehicles due to currents or springs. Always check local advisories, as some areas may have specific regulations against vehicles on the ice. For comprehensive New York Ice Fishing Rules, you can always check the official DEC guidelines.
Vehicles and Ice Shacks: Weighing the Risks
This is where the stakes get really high. Parking a full-sized vehicle or even a substantial portable ice shack on the ice requires considerable thickness. For light vehicles (like a small car or truck), the absolute minimum recommended thickness is 8-12 inches of clear, solid ice. For heavier vehicles, or multiple vehicles in one area, this could increase to 12-15 inches or more. When setting up a stationary ice shack, especially a larger, more permanent one, you're placing a constant, heavy load on one spot. The minimum recommendation for a large ice shack is often in the 8-10 inch range for clear, solid ice. However, remember that the longer a heavy object sits in one spot, the more localized stress it puts on the ice, potentially causing it to slowly degrade or "bowl" over time. Furthermore, the weight distribution of a vehicle or shack is critical. An overloaded truck or a poorly designed shack can create uneven pressure. Always spread out vehicles and shacks, and never park too close to other vehicles or known thin spots. Using a larger platform or base under your shack can also help distribute the weight. Many seasoned anglers prefer to leave their vehicles off the ice entirely, walking out or using a lighter ATV when possible, as the risk simply outweighs the convenience for many.
Here's a quick summary table of recommended minimum ice thicknesses:
| Activity / Weight | Minimum Clear, Solid Ice Thickness (inches) | Cautionary Notes |
|---|---|---|
| Foot Travel | 4 | Always check frequently, especially with gear. |
| Ice Fishing Group | 6 | Spread out, check between anglers. |
| Snowmobile / ATV | 5-7 | Avoid high speeds, check often, know the terrain. |
| Small Portable Shanty | 6 | Weight distribution, check ice under shanty periodically. |
| Light Vehicle (Car/Small Truck) | 8-12 | Park far apart, check ice before and during parking. |
| Heavy Vehicle / Large Permanent Shanty | 12-15+ | High risk, consider alternatives, always double check. |
Remember: These are MINIMUMS for clear, solid ice. Always add more inches for slushy, white, or layered ice, and factor in currents and springs.
Factors That Influence Ice Formation and Deterioration
Ice isn't static; it's constantly changing, growing, and deteriorating. Understanding the forces at play can give you an edge in predicting safe conditions and avoiding dangerous ones. It's a complex interplay of natural elements, and being aware of them is key to a successful and safe "Ice Fishing in New York: A Complete Guide."
Weather's Impact: Temperature Swings, Snowfall, and Rain
The most obvious factor affecting ice thickness is, of course, the weather. Consistent, well-below-freezing temperatures (think single digits or even negative numbers Fahrenheit) are ideal for building strong, stable ice. When you see a stretch of these conditions, the ice is likely gaining strength daily. However, even a few days of above-freezing temperatures, especially coupled with sunshine, can cause significant deterioration, particularly on the top layers. Heavy snowfall acts as an insulator, effectively slowing or even halting the thickening process beneath. A foot of fresh snow on 4 inches of ice might keep that ice from gaining any more depth, even if air temperatures drop to zero. Worse, if that snow gets wet from rain or a sudden thaw, it can create a heavy, insulating slush layer that further weakens the ice. Rain, especially if prolonged, can also bore holes through existing ice and introduce warmer water, rapidly degrading its integrity. Always check the forecast and factor recent weather patterns into your ice safety assessment.
Water Bodies and Currents: Rivers vs. Lakes, Springs, and Inlets
Not all frozen water bodies are created equal, and the type of water you're fishing dictates how ice forms and decays. Rivers, with their constant flow, are inherently more dangerous for ice fishing than still lakes. Currents prevent uniform freezing, create thin spots, and can quickly erode the underside of seemingly thick ice. Even on large lakes, inlets and outlets, or narrows where water constricts, will almost always have weaker ice due to increased current. Natural springs, which bring warmer groundwater to the surface, can create permanent open holes or dangerously thin patches, often hidden beneath a layer of snow. Imagine fishing one of the beautiful "Top New York Lakes for Ice Fishing" like Oneida Lake; while much of it may be safe, known spring areas or river mouths (like where the Oneida River drains) will remain treacherous. These features are often marked by local anglers or authorities, but it’s up to you to be aware and steer clear or approach with extreme caution. Always consult local knowledge and detailed maps to identify such areas before venturing out.
Daily and Seasonal Fluctuations
Ice conditions aren’t static; they fluctuate not just over the season, but often daily and even hourly. During the early season, ice is still forming and thickening, so vigilance is paramount. Later in the season, as spring approaches, even consistent cold nights might not be enough to counteract warmer daytime temperatures and stronger sun, leading to daily softening. The structure of the ice changes, becoming more porous and "rotten" over time, even if it measures a decent thickness. A good example of this is when New York's Finger Lakes usually freeze over; the early season offers different ice dynamics than late February or March. Furthermore, the daily freeze-thaw cycle can impact safety. A warm, sunny day might soften the ice significantly, only for it to refreeze overnight. While the surface might appear solid in the morning, the internal structure could be compromised. Always check ice conditions throughout the day, especially if you plan to stay out for an extended period, or if there's a significant change in weather.
A Step-by-Step Guide to Safely Checking Ice as You Go
Alright, so you’ve got your gear, you understand the types of ice, and you’re aware of the factors that influence its strength. Now, let’s put it all into practice with a step-by-step approach to safely checking ice as you make your way to your favorite fishing spot. This isn't about rushing; it's about methodical, cautious progression.
Initial Reconnaissance and First Steps Onto the Ice
Before you even step on the ice, take a moment for reconnaissance. Look for clear signs of previous activity, like old auger holes or tracks, but remember, don't blindly trust them. Observe the overall appearance of the ice from shore. Is it a uniform color? Are there areas of open water? Is there significant snow cover? Once you've chosen your entry point, this is where your spud bar comes in. Take your first tentative steps, always using your spud bar to strike the ice ahead of you. Hold it firmly and give a good, forceful downward thrust. If it breaks through in one or two hits, back off immediately. If it takes several solid hits to penetrate, it's likely strong enough for your weight to proceed with caution. Your goal is to work your way out from shore, drilling test holes every 10-15 feet at first, and then every 20-30 feet, especially if you're pulling a heavier sled or gear. These initial holes are critical for getting those first, precise measurements with your tape measure, confirming what your spud bar told you. As you learn "How to Read Ice Thickness for Safe Ice Fishing," remember that the edge of the lake is often the weakest point due to shoreline melting and wave action, so be extra cautious at entry points.
Continuous Monitoring and Risk Management
Getting out to your spot is only half the battle; you need to maintain continuous vigilance while you're out there. Drill new test holes frequently as you move to different areas, especially if you notice a change in ice color, texture, or if you hear any unusual sounds, like loud cracks or groans. Cracks that spiderweb or spread rapidly are often indicators of stress; listen to the ice. Remember that areas near points, islands, or structures can have different ice patterns due to varied currents or sun exposure. Even if you've been on the same spot for hours, it’s a good idea to drill a new hole periodically, especially if the weather changes. A sudden warm front or strong sunshine can degrade ice surprisingly quickly. Always carry your safety gear (ice picks, rope) within easy reach, and let someone know where you're going and when you expect to return. If you're with a group, spread out slightly to distribute weight and designate one person to lead, continuously checking the ice. Never create a large, concentrated group in one small area, as this increases the load exponentially. Being safe on the ice is a continuous process of observation, measurement, and common sense, ensuring you can enjoy your time without becoming a statistic.
Disclaimer
The information provided in this guide is for general informational purposes only and is not a substitute for professional instruction or local knowledge. Ice conditions can change rapidly and unpredictably. Always exercise extreme caution, use appropriate safety gear, and consult local authorities like the New York State Department of Environmental Conservation (DEC) for current conditions and regulations before venturing onto the ice. Your safety is your responsibility.